Extend the default Image Widget in Sitefinity

Daniel Plomp
October 14th, 2021
Background information
For a customer, I was figuring out how to make it easy for Content Editors to make use of adaptive images. Or better, how to use Art Direction (read more about Art Direction here).
So, when Content Editors upload their images into Sitefinity, they already have the option to let Sitefinity create different versions of that image. This can be done by creating thumbnails of the image, using Thumbnail Profiles. Options are to e.g. resize the image or crop the image.
In some cases that isn't enough control on how you want your images to appear. Sometimes you might want a different image on your mobile version of your website and a different version on a tablet. This could be a totally different image, or just the same image cropped to a very specific custom region.
Possible solutions
I came up with a few different solutions.
Custom widget
Create a custom widget in which you can select the different images and use the <picture> element to render the right image on the right device.Fully extend the image widget
Extend the image widget to make it possible to select more images than just the default one and also use the <picture> element to render the right image on the right device.Extend the Image model and add a designer view
Extend the current Image model with some properties and add a new designer view to the Image Widget designer, so Content Editors can 'enable/disable' the new feature.
The first solution would be the easiest to implement. A custom widget is easy to create and all the desired logic would be there. But it might not be as flexible as needed.
The second solution would be probably the most elegant way for the Content Editors. But it would involve a lot of coding to adjust the Image Widget functionality. Also may be a lot of risks for future updates of Sitefinity.
The third solution is something in between. I'll explain how it works.
Extend the Image model and add a designer view
There are three things to take care of:
Relate a mobile image and a tablet image with the original image
Let the Content Editor enable or disable the feature
Adjust the template to make use of the related images
Relate a mobile image and a tablet image with the original image
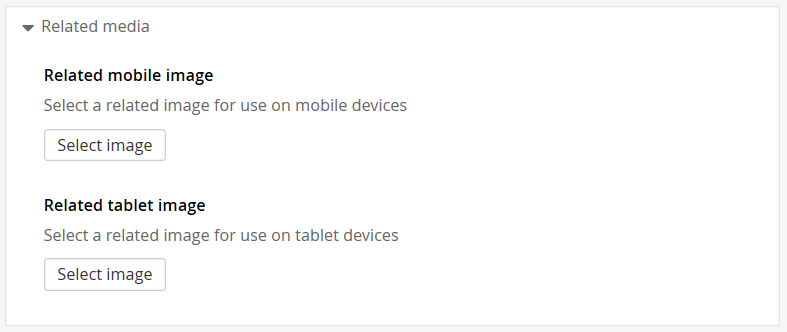
First, we make it possible to edit an Image and to let the user relate other images to it. For this, we can add some custom fields to the Image. We make use of the Related Media field type, so we can pick an image through the UI.
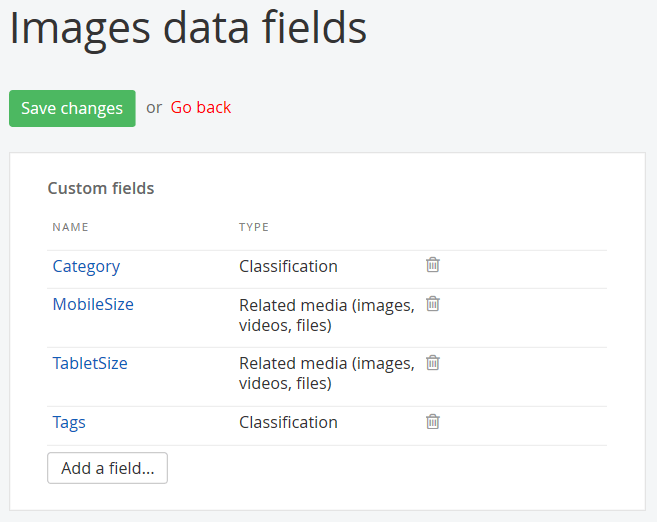
To learn how to add related data fields, or related media fields to your Content Types, please read the following documentation https://www.progress.com/documentation/sitefinity-cms/add-a-related-media-custom-field
In the end, when you edit an Image inside the Sitefinity backend, you will see a section called Related media. In there you will notice two new Image selectors, which will allow you to related two images with the one you are currently editing.
Let the Content Editor enable or disable the feature
Now that we are able to actually store related images, we want to let the Content Editor choose to use the images. We can of course enable the feature automatically by assuming that when there are related images available, we enable the rendering of adaptive images and otherwise we use the default functionality. For this blog post, however, I wanted to explain how you can let the Content Editor decide whether to use the feature or not.
We need to do a couple of steps to make the functionality available:
Create a new custom view model for the ImageViewModel
Create a new custom model for the ImageModel
Make sure Sitefinity uses this new view model as its default ImageViewModel inside the ImageWidget
Access the new properties from the Image Designer and the Image View (template)
So, first an image of how our new designer will look inside the backend:
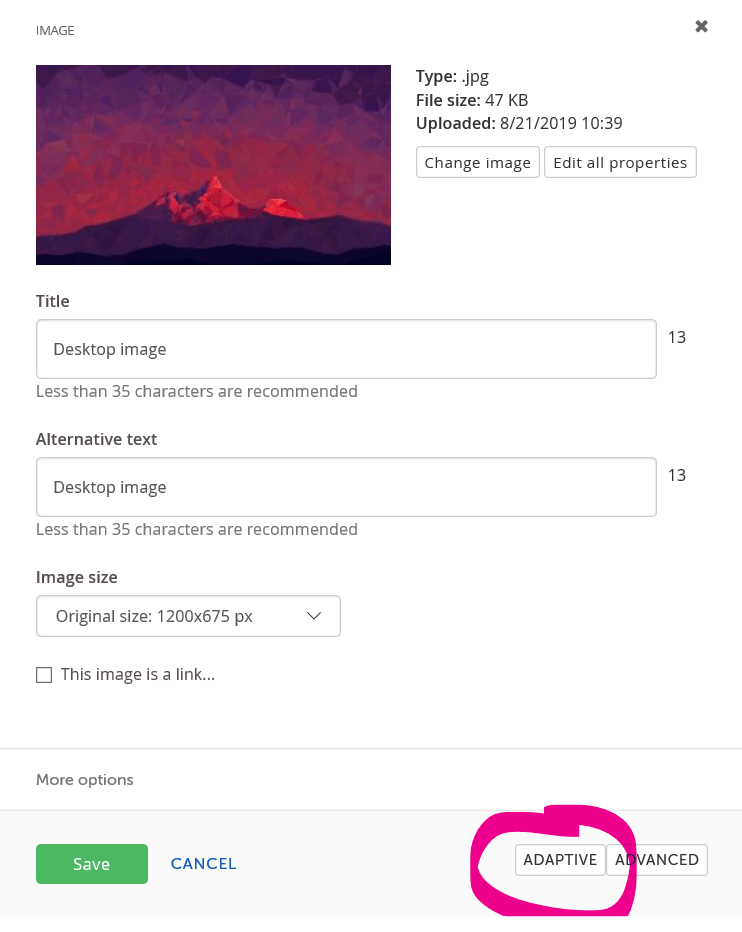
You will see the new button appear in the bottom right corner. Clicking on this button will load the new designer view:
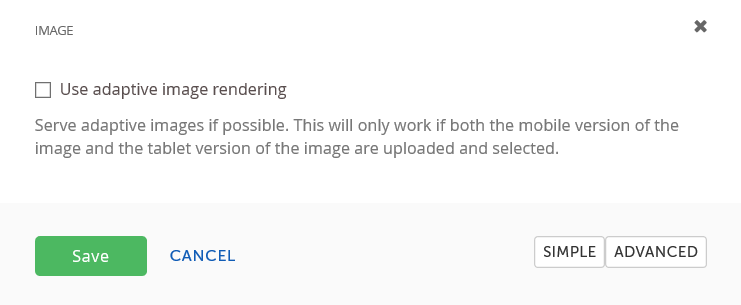
So, this way the Content Editor can enable/disable the functionality per image.
Now that you have an idea of how it will look, let's go through the steps needed to create this.
1) Create a new custom view model for the ImageViewModel
First, we are going to define the new ImageViewModel. By extending this from the existing one, we only need to add our new properties:
We have a new Boolean that will help to enable/disable the functionality. The two String fields will contain the urls to the related images.
2) Create a new custom model for the ImageModel
You see we are inheriting from the ImageModel and marked our class with the TypeConverter attribute. This will allow us to see the properties of our designer.
We map the properties of the ImageViewModel to our new CustomImageViewModel and we use a helper function to get the URLs of our related images.
3) Make sure Sitefinity uses this new view model as its default ImageViewModel inside the ImageWidget
In your Bootstrapper_Bootstrapped method that probably lives in your Global.asax, you can add some code to rebind the current ImageViewModel to our new CustomImageViewModel.
4) Access the new properties from the Image Designer and the Image View (template)
By default, the designer uses the ControlPropertyService to read/write the widget properties. It uses the Controller properties and the inner properties of the Model property. However, the Model property in the Controller is the model Interface type.
The Designer uses the Model property and resolves it using Property Descriptors. It gets the property type, which is the interface of the model. Using the interface type, it generates the properties and passes them to the designer. This is why the properties from the custom model do not appear and cannot be modified out of the box from the Designer.
We can solve this by overriding the default Property Descriptors. This way the actual Model type is used to generate the properties passed to the designer. This way the custom Model properties can also be set using the Default designer.
We need a couple of files, which can be placed anywhere in your project:
And after you have created these files and made sure your project still builds, we also need to add them to our Bootstrapper_Bootstrapped method:
Wow! That was a lot of coding. Let's now actually do the fun part and create a new designer view for the Image Widget. You can read about creating designer views and the naming conventions here: https://www.progress.com/documentation/sitefinity-cms/create-custom-designer-views-mvc
And finally, we can create our new Image View, which is the actual template that is used when an image is rendered. I decided to override the default view, but it is easy to create a new view with some custom logic and let the Content Editor choose this view from the Image Widget designer.
Inside this code, we can use some Razor helpers to get the results we want. If the option UseAdaptiveRendering isn't used, the template will just render the image with the default options (according to Sitefinity standards). If it is enabled, the template will generate a <picture> tag that will render a picture element that uses the default image, but also the Mobile and Tablet versions.
About the HTML Picture element
The <picture> element is almost supported by every modern browser. Since I had to support also IE11, I had to make use of an external library called picturefill.js. So, if you need to support older browsers, add a reference to that library also!
More information you can find here: https://scottjehl.github.io/picturefill/
Conclusion
I hope this blog post was helpful. Let me know if you have any questions!
