Extend a Dynamic Module Widget Designer with your own properties

Daniel Plomp
December 31st, 2018
Background information
For a project that I was working on recently, I needed to extend some default behaviors of the Dynamic Module Widget. These widgets are generated by the Dynamic Module Builder and help you to quickly create fully functional modules on the fly. Of course, when you need specific functionality in a widget, you need to dive into the details.
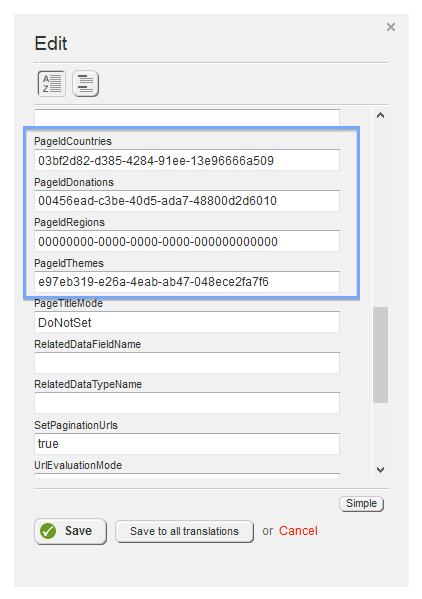
If you develop a normal, stand-alone widget, it is quite easy to work with your own properties. Like if you want the user to enter some text that is used for displaying a title on the frontend of the website, you can just define a string property. Sitefinity will make sure that this property ends up in the Advanced Settings of your widgets designer like you can see in the following example, where I have defined some properties that hold Guid's of some pages inside the CMS:
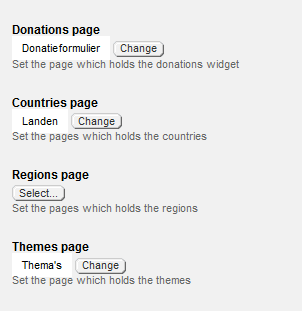
With the help of Sitefinity Thunder or just your own code, you can create designer windows for this widget, that shows these properties in a more user-friendly way like I have done here:
What about Dynamic Module Designers?
So the widgets that the Dynamic Module Builder generates also come with a designer and out of the box, it is quite difficult to extend these widgets with your own properties and even better: your own designer.
The Use Case
Of course, some Use Cases came up and I needed to dive into this problem to find a solution. So what we need was indeed to have some way to store Page ids with the Dynamic Module Widget.
This website has a Dynamic Module for Projects. These projects are visible on an overview page like shown below:
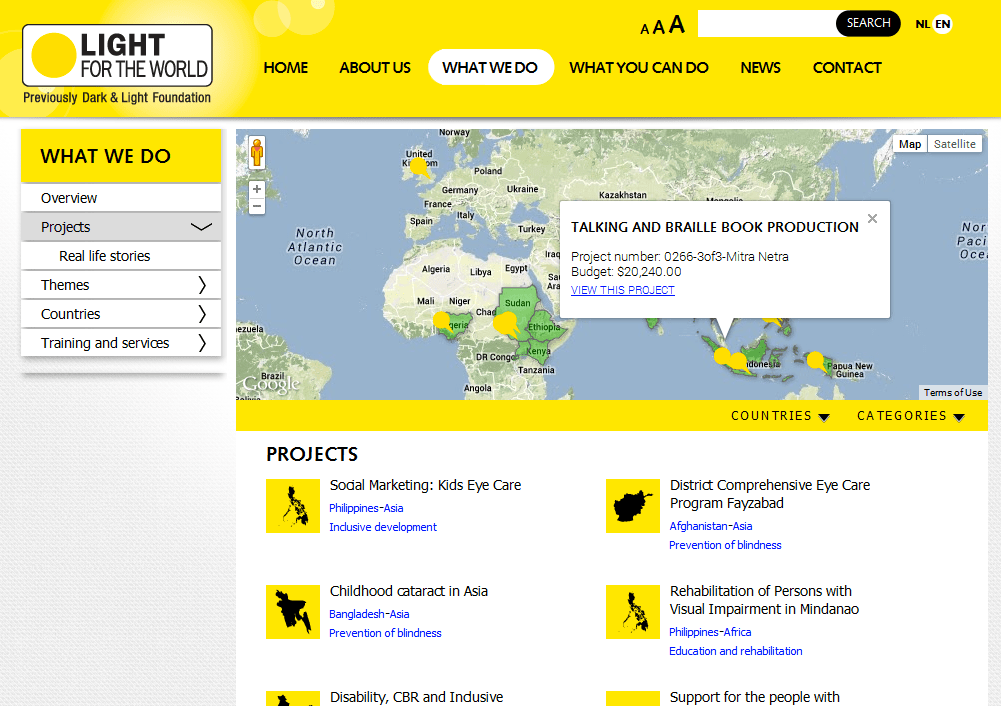
Whenever a visitor clicks on a specific project, it will be redirected to a page that shows the project details.
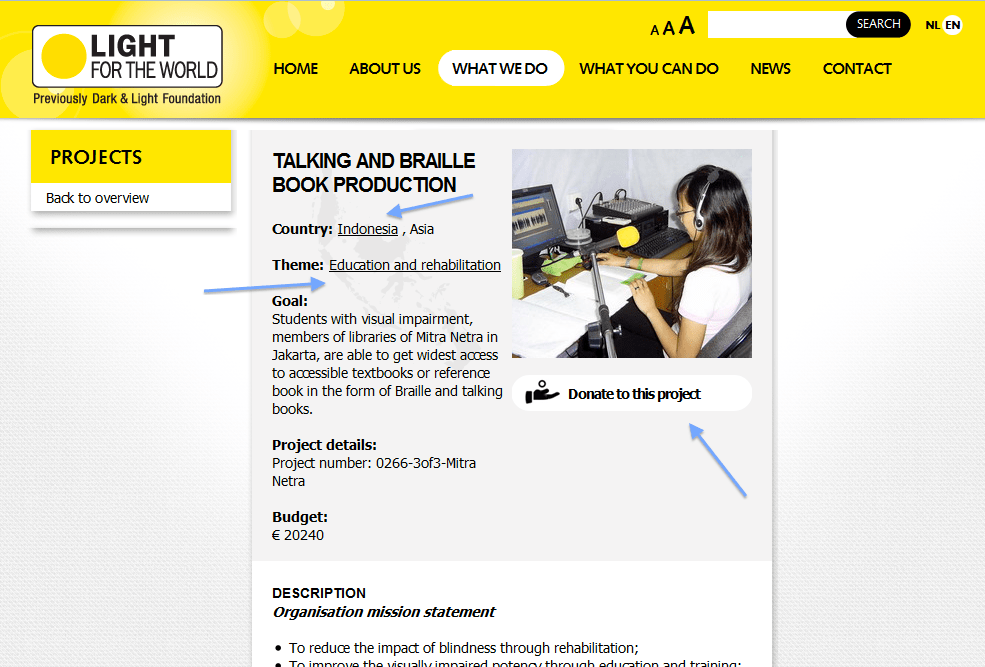
On this detail page, there are some links that will redirect the visitor to other pages. The first two links are coming from a Taxonomy field out of our Dynamic Module, the third link is one of those Page ID fields (Guid[]). Clicking on these links will redirect to specific pages with or without some extra parameters.
The solution
So first we need to drop the idea that we can use the generated widgets for this. We have to come up with our own implementation of the Dynamic Module widget. Of course don't have to rewrite it from scratch, since we can inherit from those classes.
We need to follow the next steps to create such implementation:
Create our own DynamicContentView
Create our own DynamicContentViewDesigner
Create our own CustomContentViewDesigner
Link it all together
Add the widget to the Toolbox
Use the properties in your code
That sounds scary, right? But it is quite straightforward.
1. Create our own DynamicContentView
The first thing we need to do is to create our ProjectsDynamicContentView which will be replacing the generated Dynamic Content Widget. This is also the class/control that will be added to the Toolbox.
The code for this class you can find below:
What we actually do is that we use all the built-in functionality of the DynamicContentView, but in this example, we also tell Sitefinity to use a specific MasterListView, instead of the default one. Regarding the topic of this blog post, I'm not going into that.
What we see is that I have defined the four custom properties that I needed.
2. Create our own DynamicContentViewDesigner
Now that we have the DynamicContentView, we need to implement its designer. If we do nothing at this point, the default designer of the Dynamic Content Widget will show up.
We need to create a class named ProjectsDynamicContentViewDesigner that inherits from DynamicContentViewDesigner so that we can extend it to our needs. You can find the code for this class below:
Here you see that we override the AddViews method to add a new View to the designer. This new view is also a new class that inherits from ContentViewDesignerView.
3. Create our own CustomContentViewDesigner
The code for that class you can see below. I did not insert all the code, since I defined 4 PageSelectors, so in the example, I use just one PageSelector.
From this point, it is actually the same approach when you create designers for your custom UserControls. It has a class, a template, and a javascript file.
I know, it is a lot of code for a simple PageSelector ;)
4. Link it all together
Now that we have all our classes defined, we need to tell Sitefinity that whenever our custom DynamicContentView is placed on a page, it should not use the default designer, but our custom designer. For that, we need to decorate the ProjectsDynamicContentView class with an attribute:
[ControlDesigner(typeof(ProjectsDynamicContentViewDesigner))]
 public class ProjectsDynamicContentView : DynamicContentView {
This will tell Sitefinity to use our custom DynamicContentViewDesigner.
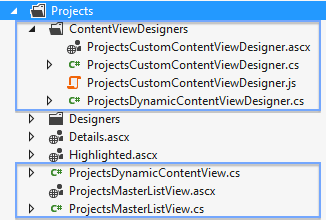
At this point I created the following classes and files for my Dynamic Module:
5. Add the widget to the Toolbox
The last thing we need to do is to add this new ProjectsDynamicContentView in our toolbox. I registered it like this:
<add enabled="True" type="SitefinityWebApp.Widgets.Projects.ProjectsDynamicContentView, SitefinityWebApp" title="Projects overview" cssClass="sfNewsViewIcn" moduleName="Projects" DynamicContentTypeName="Telerik.Sitefinity.DynamicTypes.Model.Projects.Project" DefaultMasterTemplateKey="1fedbd9d-b27d-6052-a3f7-ff00004a31dd" DefaultDetailTemplateKey="20edbd9d-b27d-6052-a3f7-ff00004a31dd" visibilityMode="None" name="Telerik.Sitefinity.DynamicTypes.Model.Projects.Project" />You can take the code from the generated widget as an example for the registration. You need to change the Type property to refer to the class we just created.
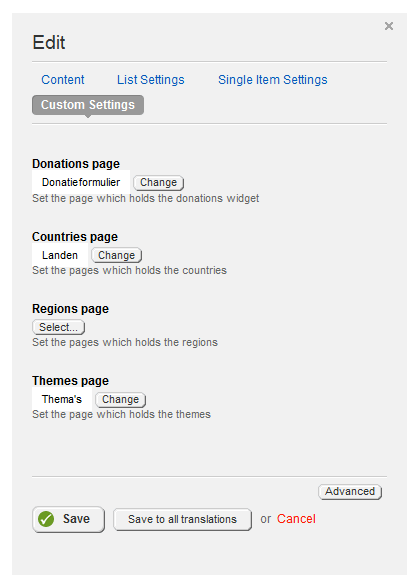
If we now drop the widget onto our page, we can see our designer, with the custom view:
6. Use the properties in your code
In the end, I created a new template that I referred to from my Dynamic Content widget. You can use the built-in templates, or define your own. I choose the last one since I needed to use some code-behind coding.
During the OnDataBound event, I define the links that you see on the Projects Detail page. In the code I refer to the custom properties:
// First we need to get the project host
var projectsView = this.GetHostControl<ProjectsDynamicContentView>();

// Then we can resolve the page, based on the PageIdCountries property
country.NavigateUrl = string.Concat(projectsView.PageIdCountries.GetPage().GetUrl(), "/", t.Name);
Finally!
So these are the steps you need to take in order to achieve the Use Case as described above. I didn't verify this with Sitefinity, so there might be an easier way to do this, but for now, this works fine.
About this Sitefinity project
LIGHT FOR THE WORLD is an NGO committed to saving eyesight, improving the quality of life, and advocating for the rights of persons with disabilities in the underprivileged regions of our world.
Make sure to visit their website for more information: http://www.lightfortheworld.nl
